TestCryptoStopper.exe was developed for use with CryptoStopper™. We wanted to give our customers a safe and easy way to test the effectiveness of CryptoStopper™ against a ransomware attack.

UPDATE: TestCryptoStopper has been replaced by WatchPoint Simulator Script.
TestCryptoStopper
Overview
TestCryptoStopper.exe was developed for use with CryptoStopper™. We wanted to give our customers a safe and easy way to test the effectiveness of CryptoStopper™ against a ransomware attack.
TestCryptoStopper.exe allows trial and paid customers to safely mimic a ransomware attack. This alleviates the need for a secure test environment and it removes the danger of downloading actual ransomware variants. With TestCryptoStopper.exe you’ll get a first-hand look at how quickly CryptoStopper™ stops a ransomware attack.
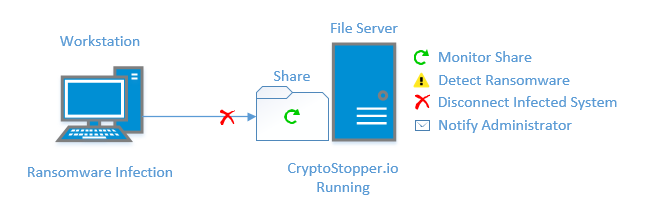
Run TestCryptoStopper.exe from a workstation computer and safely attack a network share. This is helpful in a few ways. You’ll become familiar with CryptoStopper™ and also what happens when a ransomware attack occurs, while confirming that CryptoStopper™ is indeed working.
Steps have been intentionally added to ensure the testing process does not damage network files or allow malicious actors to modify the code to create real ransomware.
How safe is it?
TestCryptoStopper.exe was built for and tested in production environments. CryptoStopper™ is designed to only encrypt the WatcherFiles that are created by CryptoStopper™. It will not encrypt or otherwise harm the other files on your system. No one (except cybercriminals, of course) wants to intentionally or unintentionally encrypt a production file share, especially the team here at WatchPoint, which is why the encryption routine only affects the WatcherFiles.
Instructions
The first step is to download CryptoStopper™. Next, download the installation manual here. TestCryptoStopper.exe is designed to be run from a workstation computer but first needs to be configured on the server running CryptoStopper™.
- From a server that is running CryptoStopper, download TestCryptoStopper.exe and save it to the “C:\Program Files\CryptoStopper” directory.
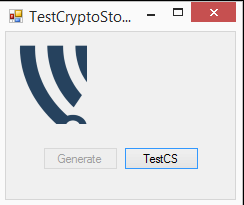
- Right-click > ‘Run As Administrator’.
- Click ‘Generate’. This creates a new file called TestWatcherFiles.csv. As a security measure, the file is encrypted so that only TestCryptoStopper.exe can read the contents.

Important Note – Using TestCryptoStopper.exe will result in the computer being disconnected from the server. Please close any programs you have open.
4. Next copy TestCryptoStopper.exe and TestWatcherFiles.csv to the workstation from which you’ll run the test. In this example, I’ve copied them to the desktop of my workstation.
![]()
With TestCryptoStopper.exe and TestWatcherFiles.csv in the same directory and on your workstation, let’s run our test.
5. Double-click and select TestCS
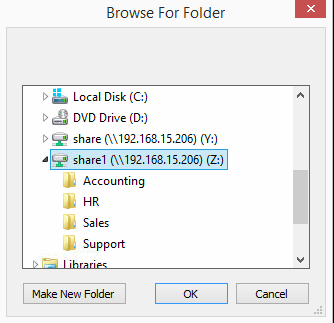
6. Browse to a shared folder that is being protected by CryptoStopper™ and select OK.
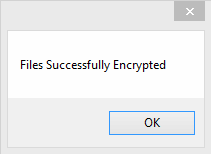
7. Next you’ll see a window letting you know the files were successfully encrypted.
8. Then a few seconds after that, you’ll see this:
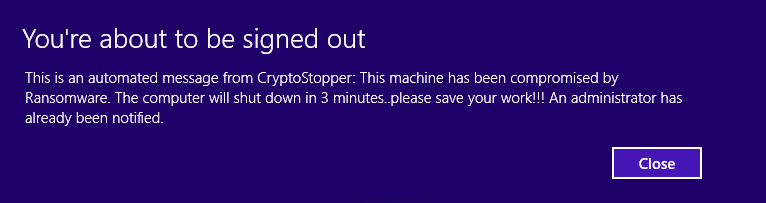
*Tip, open a command prompt and issue ‘shutdown –a’ to cancel the shutdown process.
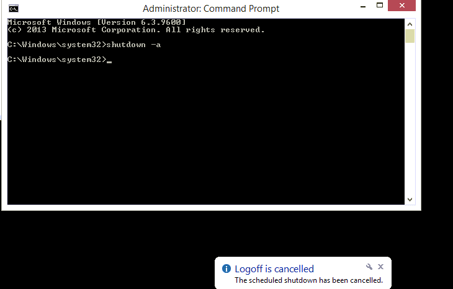
9. At this point, the workstation is disconnected from the server. This is evident by a red X on the network drive and your inability to communicate to the server.
Cleanup
Cleanup will be done via the server. So move to the server that is running CryptoStopper for the next steps.
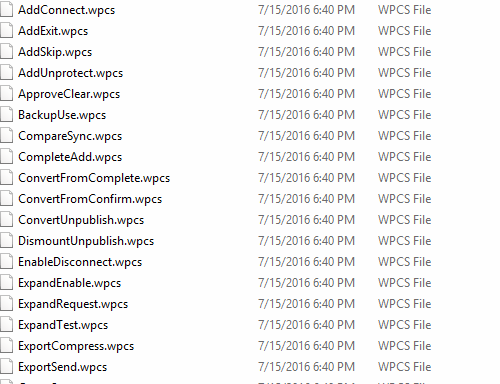
10. You can identify the files that were encrypted via the .wpcs file extension
11. Delete the files ending in .wpcs, and new WatcherFiles will automatically take their place. This puts your system back into a ready state.
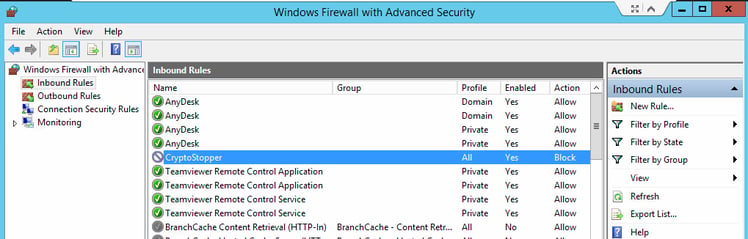
12. Next, we need to remove the windows firewall rule that is blocking our ‘infected’ workstation.
13. On the server, open ‘Windows Firewall with Advanced Security’ and select ‘Inbound Rules'.
14. Right-click CryptoStopper and select properties.
15. Use the scope tab to remove the computer’s IP address.
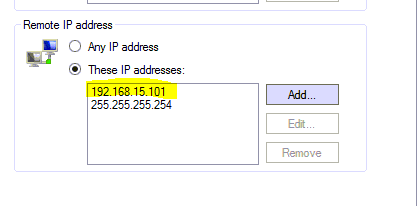
16. 255.255.254 is needed by CryptoStopper and should remain in the scope.
17. That’s it – test complete.